Enable Multi-Gateway

You can enable multi-gateway for a VM instance in the following scenarios:

Create a VM Instance with Multi-Gateway Enabled

To create a VM instance with multi-gateway enabled, follow these steps:
  1. Log in to the Cloud using zstack-cli.
    Suppose that the account name is admin, run the following zstack-cli commands to log in to the Cloud:
    [root@10-0-5-87 ~]# zstack-cli admin >>>LogInByAccount accountName=admin password=password
    • accountName: The account name.
    • password: The account password.
  2. Create a VM instance with multi-gateway enabled.
    Run the following command to create a VM instance with muti-gateway enabled:
    admin >>>CreateVmInstance name=VM instanceOfferingUuid=212a84a3c5324d8b880def26bbbcf31f imageUuid=43865d648c8155538f5d76292634da05 l3NetworkUuids='fd4eca3d6d5d4d30afea94a1be6d48da,3b60d16ead2f4a07a7869258315a3511' defaultL3NetworkUuid='fd4eca3d6d5d4d30afea94a1be6d48da' systemTags='vmMultipleGateway::true'
    • name: The VM instance name.
    • instanceOfferingUuid: The instance offering UUID for the new VM instance.
    • imageUuid: The image UUID for the new VM instance.
    • l3NetworkUuids: The L3 network UUID list for the new VM instance.
    • defaultL3NetworkUuid: The L3 network UUID for the default VM NIC.
    • systemTags: The SystemTag that configures the multi-gateway status. Use systemTags='vmMultipleGateway::true'.

    The above example only lists the required parameters for creating a VM instance. For more information, refer to CreateVmInstance in API Reference.

  3. Verify the multi-gateway status.

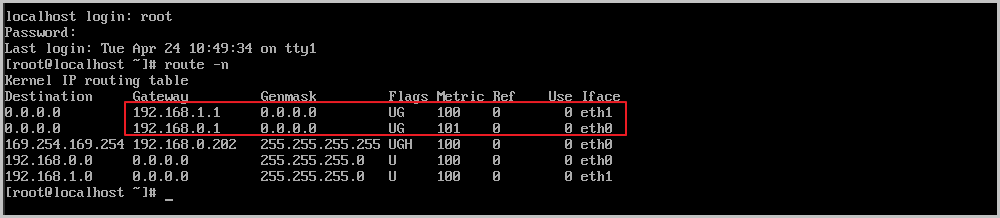
    Launch the console of the VM instance and log in. Run the route -n command to check the gateway configuration.

    Figure 1. Check the Gateway Configuration


Enable Multi-Gateway for an Existing VM Instance

To enable multi-gateway for an existing VM instance, follow these steps:
  1. Check the multi-gateway configuration of a VM instance.

    Enter the details page of a VM instance, and then choose Configuration Info > NIC. On the NIC page, check and ensure that the VM instance has more than one NIC and is disabled with multi-gateway.

  2. Log in to the Cloud using zstack-cli.
    Suppose that the account name is admin, run the following zstack-cli commands to log in to the Cloud:
    [root@10-0-5-87 ~]# zstack-cli admin >>>LogInByAccount accountName=admin password=password
    • accountName: The account name.
    • password: The account password.
  3. Enable multi-gateway.
    Run the following command to enable multi-gateway for the VM instance:
    admin >>>CreateSystemTag resourceType=VmInstanceVO tag='vmMultipleGateway::true' resourceUuid=32127778d053473f97498dbef8189fb2
    • resourceType: The resource type of the VM instance. Use resourceType=VmInstanceVO.
    • tag: The system tag. Use tag='vmMultipleGateway::true'.
    • resourceUuid: The VM instance UUID.
    Note: The above configuration only takes effect after you restart the VM instance.
  4. Verify the multi-gateway status.

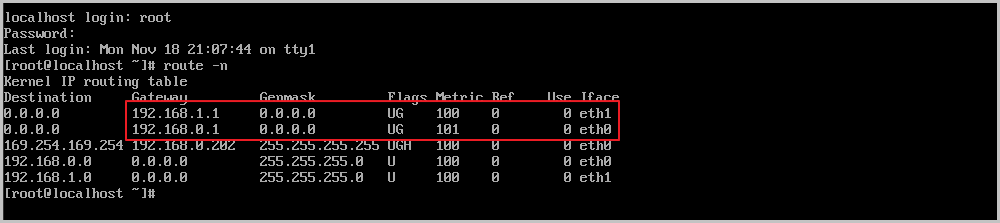
    After the VM instance restarts, launch the console of the VM instance and log in. Run the route -n command to check the gateway configuration.

    Figure 1. Check the Gateway Configuration


Back to Top

Download

Already filled the basic info?Click here.

Enter at least 2 characters.
Invalid mobile number.
Enter at least 4 characters.
Invalid email address.
Wrong code. Try again. Send Code Resend Code (60s)

An email with a verification code will be sent to you. Make sure the address you provided is valid and correct.

同意 不同意

I have read and concur with the Site TermsPrivacy PolicyRules and Conventions on User Management of ZStack Cloud

Download

Not filled the basic info yet? Click here.

Invalid email address or mobile number.
同意 不同意

I have read and concur with the Site TermsPrivacy PolicyRules and Conventions on User Management of ZStack Cloud

Email Us

contact@zstack.io
ZStack Training and Certification
Enter at least 2 characters.
Invalid mobile number.
Enter at least 4 characters.
Invalid email address.
Wrong code. Try again. Send Code Resend Code (60s)

同意 不同意

I have read and concur with the Site TermsPrivacy PolicyRules and Conventions on User Management of ZStack Cloud

Email Us

contact@zstack.io
Request Trial
Enter at least 2 characters.
Invalid mobile number.
Enter at least 4 characters.
Invalid email address.
Wrong code. Try again. Send Code Resend Code (60s)

同意 不同意

I have read and concur with the Site TermsPrivacy PolicyRules and Conventions on User Management of ZStack Cloud

Email Us

contact@zstack.io

The download link is sent to your email address.

If you don't see it, check your spam folder, subscription folder, or AD folder. After receiving the email, click the URL to download the documentation.

The download link is sent to your email address.

If you don't see it, check your spam folder, subscription folder, or AD folder.
Or click on the URL below. (For Internet Explorer, right-click the URL and save it.)

Thank you for using ZStack products and services.

Submit successfully.

We'll connect soon.

Thank you for using ZStack products and services.