


ZStack Cloud Platform
Single Server Deployment with Full Features, Free for One Year

Comprehensive product documentation and tools

Upholding the value of Customer First and the mission of Serving Customer, ZStack is dedicated to providing secure and stable services for customers.

To educate ZStack partners and interested individuals about cloud computing and to cultivate cloud computing talent.

ZStack provides innovative cloud infrastructure for ten major industries

The report provides three major
solutions and customer case studies for transitioning from VMware to ZStack.
When you build a component and need to test its functionality, you usually write a large number of automation scripts to simulate user behavior and ensure it works as expected. However, as the project grows more complex, these testing scripts also become larger and harder to maintain.
At this point, you might wonder:
“Can I just tell the tool in natural language — ‘please test the click effect of this button for me’?”
In the past, this idea might have seemed far-fetched. But today, with the rise of large language models (LLMs) and the continuous innovation of the Playwright ecosystem, this fantasy is becoming reality.
The key enabler is what we’ll explore today — playwright-mcp.
The core position of playwright-mcp (Model Context Protocol) is to act as a bridge.
It runs as a local service, allowing your AI assistant to connect and gain control over the browser.
You don’t need complex global installation.
The design philosophy of playwright-mcp is on-demand startup — the simplest way is to use npx.
Most AI tools that support MCP (such as Cursor) allow you to add an mcpServers field in their JSON configuration. Example:
{
“mcpServers”: {
“playwright”: {
“command”: “npx”,
“args”: [
“@playwright/mcp@latest”
]
}
}
}
If you are a VS Code or Cursor user, simply run the following command in your terminal:
code –add-mcp ‘{“name”:”playwright”,”command”:”npx”,”args”:[“@playwright/mcp@latest”]}’
After execution, VS Code will automatically add this service info to the configuration.
Once done, you’ll see this MCP configuration entry in your Cursor MCP Tools.
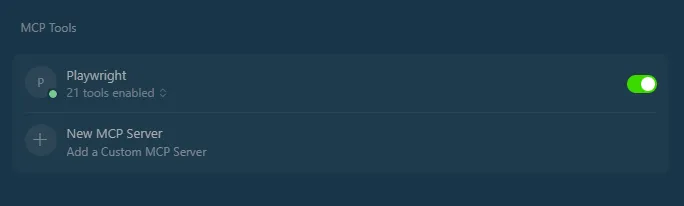
MCP Tools
playwright-mcp provides rich command-line parameters, allowing you to refine control of the automation environment through the args array.
Once configured, you can start interacting!
In your AI assistant chat window, just use natural language to give commands.
Example:
➡ You:
Use playwright to open github.com, enter microsoft/playwright-mcp in the search bar, and search, then click the first result.”
➡ AI Assistant (in the background):
At this point, Cursor successfully opened the browser and navigated there.
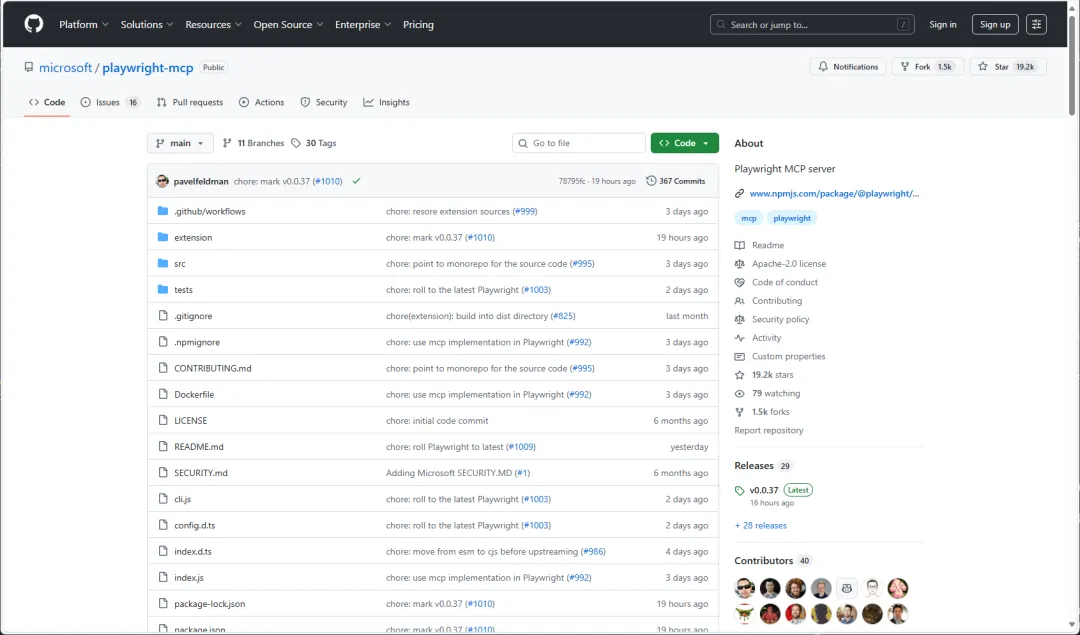
microsoft/playwright-mcp
At the same time, we can see the output from Cursor and the entire MCP call.

Cursor Output
Now, you’ve mastered the basic workflow of collaborating with AI. Next, let’s dive beneath the surface and see how all of this actually works.
The success of playwright-mcp lies in abandoning fragile screenshot-based visual analysis and instead adopting a structured understanding approach — more stable and efficient.
This is playwright-mcp’s secret weapon — the most revolutionary part.
When AI needs to “see” a page, it doesn’t use screenshots but calls Playwright’s
page.accessibility.snapshot().
Example code in
playwright/packages/playwright-core/src/server/dispatchers/pageDispatcher.ts:
async accessibilitySnapshot(params: channels.PageAccessibilitySnapshotParams, progress: Progress): Promise<channels.PageAccessibilitySnapshotResult> {
const rootAXNode = await progress.race(this._page.accessibility.snapshot({
interestingOnly: params.interestingOnly,
root: params.root ? (params.root as ElementHandleDispatcher)._elementHandle : undefined
}));
return { rootAXNode: rootAXNode || undefined };
}
It’s a semantic tree the browser generates for assistive technologies (like screen readers).
It includes meaningful elements only — their role (e.g., button, link, heading), name (button text), and state (checked, disabled), etc.
Imagine giving the AI a screenshot of a login page — what it sees is just a cluster of pixels, requiring complex image recognition to guess where the input box is.
In contrast, page.accessibility.snapshot() gives the AI a piece of JSON like this:
{
“role”: “textbox”,
“name”: “Username or email address”
},
{
“role”: “button”,
“name”: “Sign in”
}
However, if the AOM data were passed directly to the LLM, the context would be enormous.
Therefore, playwright-mcp does not directly feed the massive, raw JSON object returned by this API to the LLM.
Instead, it first performs serialization — which is precisely the most ingenious step in the design of playwright-mcp.
After obtaining the raw accessibility tree, it runs a custom serializer (Serializer) that converts the data into a YAML-style text format, tailor-made and highly optimized for LLMs.
For example, in the operation we just performed, when Cursor attempted to invoke the browser_snapshot tool, Playwright returned the following content to Cursor:
### Page state
– Page URL: https://github.com/search?q=microsoft%2Fplaywright-mcp&type=repositories
– Page Title: Repository search results · GitHub
– Page Snapshot:
“`yaml
– generic [ref=e1]:
– generic [ref=e2]:
– generic [ref=e3]:
– link “Skip to content” [ref=e4] [cursor=pointer]:
– /url: “#start-of-content”
– banner [ref=e6]:
– heading “Navigation Menu” [level=2] [ref=e7]
– generic [ref=e8]:
– link “Homepage” [ref=e10] [cursor=pointer]:
– /url: /
– img [ref=e11]
– generic [ref=e13]:
– navigation “Global” [ref=e14]:
– list [ref=e15]:
– listitem [ref=e16]:
– button “Platform” [ref=e17] [cursor=pointer]:
– text: Platform
– img [ref=e18]
– listitem [ref=e20]:
– button “Solutions” [ref=e21] [cursor=pointer]:
– text: Solutions
– img [ref=e22]
– listitem [ref=e24]:
– button “Resources” [ref=e25] [cursor=pointer]:
– text: Resources
– img [ref=e26]
– listitem [ref=e28]:
– button “Open Source” [ref=e29] [cursor=pointer]:
– text: Open Source
– img [ref=e30]
– listitem [ref=e32]:
– button “Enterprise” [ref=e33] [cursor=pointer]:
– text: Enterprise
– img [ref=e34]
– listitem [ref=e36]:
– link “Pricing” [ref=e37] [cursor=pointer]:
– /url: https://github.com/pricing
…
Let’s analyze a few key features of this format and understand why it is so efficient for LLMs:

Cursor Toolchain Invocation
This format retains only the information most valuable for the LLM’s decision-making — such as role, name, URL, and reference ID — while discarding a large amount of irrelevant DOM attributes.This greatly optimizes both the length and efficiency of the prompt.
playwright-mcp is not just a tool — it represents a new automation paradigm.
By combining LLM’s natural language reasoning with Playwright’s precise browser control, it unlocks true intelligent automation.
It moves beyond traditional CV+AI’s unreliability and delay, offering a deterministic, efficient “AI vision” via the Accessibility Tree.
This will transform how automation tests, RPA, smart data scraping, and accessibility testing are written — opening up vast new possibilities.
A: Playwright-MCP is a bridge between large language models (LLMs) and browsers. Instead of relying on fragile screenshot recognition, it lets AI understand a page through its AOM Tree — the same structure used by screen readers. That means your AI can “see” elements semantically (buttons, inputs, links) and operate with stable references, not pixels. The result: smarter, faster, and far more reliable automated testing.
A: ZStack Cloud provides full GPU resource management — from SR-IOV passthrough to mediated devices (mdev). These features let enterprises run AI training, inference, and visualization workloads efficiently. Using Playwright-MCP, testers can simulate user actions on the ZStack console (like attaching a GPU to a VM) and confirm that backend resources respond correctly. It brings human-like validation into GPU-heavy environments.
A: During VMware replacement projects, teams often need to validate functional parity between the old and new platforms. By combining those routes with Playwright-MCP, you can script natural-language validation tasks that continuously check VM creation, storage mounting, or HA behaviors across both environments. It shortens testing cycles and helps ensure migration stability.
A: ZStack is a leading Chinese enterprise cloud provider offering full-stack products — ZStack Cloud for private cloud and virtualization, ZStack Cube for hyper-converged deployment, and ZStack Edge/ZStack Zaku for container and edge computing.
For AI and automation teams, ZStack provides the infrastructure layer (VMs, GPUs, storage, APIs) that pairs perfectly with tools like Playwright-MCP, allowing developers to build intelligent, repeatable workflows that test, deploy, and scale cloud resources with minimal manual effort.
 2024-12-12
2024-10-24
2024-12-12
2024-10-24


